- Custom Display Manufacturer Since 2008.
- +86 13423118038
- sales@youseedisplay.com
Auo Au Optronics Tft Lcd Displays.Touch screen alarm information display setting method

Oled Display Fundamentals And Applications.The frequency converter is displayed on the touch screen
10/10/2022
What Is An Oled Display.Can you burn the screen?
10/11/2022
Auo Au Optronics Tft Lcd Displays.Touch screen alarm information display setting method. Man-machine interface (HMI) is a very commonly used device in automation equipment, which is used to replace the physical buttons or display instructions on the operation panel.
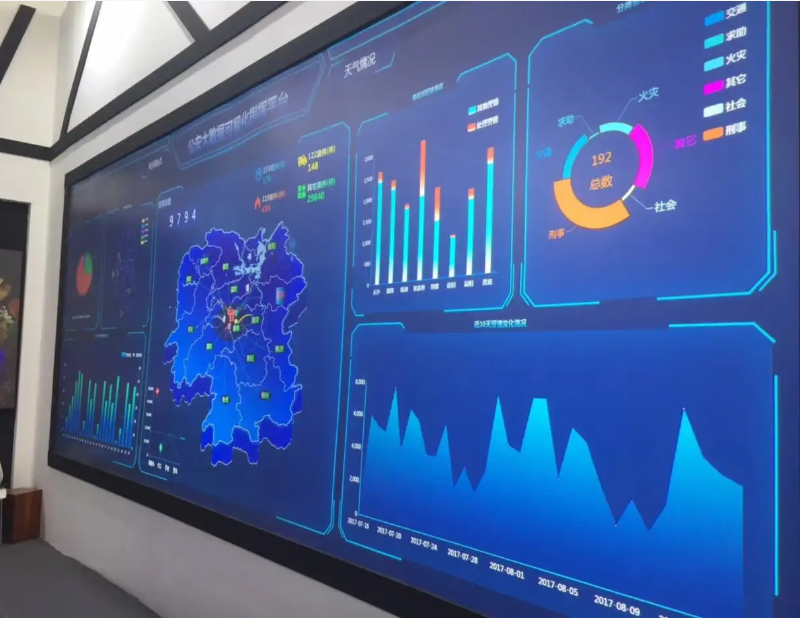
The application of the man-machine interface greatly reduces the size of the operation panel of the equipment and improves the overall aesthetics of the equipment. With the improvement of the degree of automation of automation equipment, it also puts forward higher requirements for the alarm information of the equipment. Such as alarm information record query, alarm information rolling display and so on.
Here on the man-machine interface alarm information setting method to share with you. Here is an example of the alarm setting method of Delta man-machine interface.
Build the foundation project shown below in the Delta touchscreen programming software DOPSoft 2.00.07.
Click the “alarm display” tool in the toolbar to display options such as “Historical alarm Table”, “current alarm Table”, “alarm message Walking Lantern” and so on. In the process of man-machine interface design, you can choose according to the needs. Generally, select “alarm message Walking Lamp” in the main interface and display “Historical alarm Table” on the query page.
Here is mainly to share how to set the alarm display, so in order to facilitate the display, put all the above tools on one page. The added interface is shown in the following figure.
Select “options”-“alarm Settings” in the menu bar, and the alarm settings dialog box pops up.
In the alarm Settings dialog box, set it to $0 in “alarm address”-“read address” (because we do not use a physical connection, we use an internal address through simulation). That is, the alarm information is read from the address $0. In the Information content field, set the alarm prompt. That is, the specific content that needs to be displayed to the interface to operate the man-machine.
After completing the above settings. When the software simulation is turned on, when the address $0 is set to 1, alarm messages are immediately output in “Historical alarm record”, “current alarm record” and “Walking Horse Lamp alarm”, as shown in the following figure.
When the address $0 is set to 1, the alarm message is displayed as “a”
When the address $0 is set to 2, the alarm message is displayed as “b”
When the address $0 is set to 4, the alarm message is displayed as “c”
In the above testing process, the alarm information parameters are set to data like 1, 2, 4, and the setting data of the third message c is 4, so why not set it to 3? In fact, the alarm information is read according to the bit, that is, although the alarm message reads the address setting bit $0, the actual alarm information is read according to the bit from the set address. According to the 8421 code code, data 1 is the first bit, data 2 is the second bit, data 4 is the third bit, and data 8 is the fourth bit.
Alarm messages are read in bits, and $0 has 16 bits, so you can only set 16 fault messages, but how to set more than 16 alarm messages?
As follows, in the alarm Settings dialog box, set the information number 17 to aa.
Start the simulation again and set $0 to 0 and 1 to 1. As you can see, the alarm message aa output.
As can be seen from the above test, if there are more than 16 alarm messages, you can continue to add them back, and the reading address will be automatically postponed.